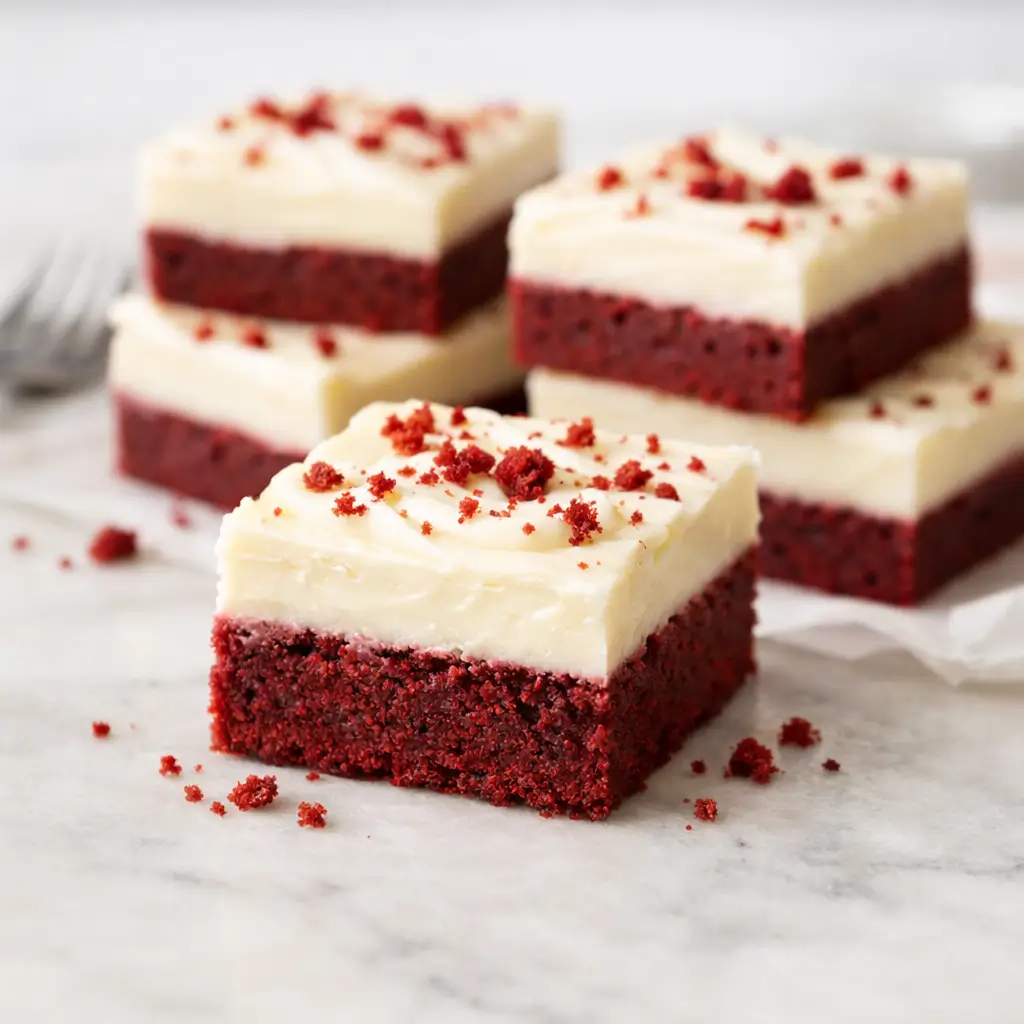
Red Velvet Cheesecake Bars combine the deep cocoa richness of red velvet with the smooth creaminess of classic cheesecake in an easy-to-slice bar format. This recipe delivers bold color, clean layers, and bakery-style texture without the complexity of a full cheesecake. Each bite balances fudgy red velvet, silky cheesecake, and just enough sweetness to feel indulgent without being overwhelming.
These bars are ideal for holidays, parties, Valentine’s Day, and make-ahead desserts. They also store well, slice cleanly, and photograph beautifully, which makes them perfect for both entertaining and content creation.
Why Red Velvet Cheesecake Bars Work So Well
Red velvet and cheesecake are both rich desserts. However, when combined thoughtfully, they enhance each other instead of competing.
Red velvet brings:
- Mild cocoa flavor
- Moist, tender crumb
- Iconic deep red color
Cheesecake adds:
- Tangy cream cheese balance
- Dense, creamy texture
- Structural contrast to the base
The bar format improves everything. Baking the layers together creates clean edges, faster baking time, and easier serving. Unlike traditional cheesecakes, these bars do not require a water bath or springform pan.

What Makes These Bars Different from Cheesecake Cakes
Red Velvet Cheesecake Bars are not simply sliced cheesecake. The structure is fundamentally different.
Key differences:
- Bars bake faster and more evenly
- The red velvet base is denser, like a brownie
- The cheesecake layer is thinner and more stable
- No tall rise, no cracking issues
- Cleaner slices with less chilling time
This makes them ideal for beginner bakers and high-volume baking.
Ingredients Overview
This recipe uses simple, accessible ingredients. Each one plays a precise role.
Red Velvet Base
- All-purpose flour for structure
- Cocoa powder for subtle chocolate flavor
- Butter for richness
- Sugar for sweetness and moisture
- Eggs for binding
- Red food coloring for color
- Vanilla extract for depth
Cheesecake Layer
- Full-fat cream cheese for stability
- Sugar for sweetness
- Egg for structure
- Vanilla extract for flavor
- Sour cream or heavy cream for smoothness
Using full-fat cream cheese is essential. Low-fat versions will result in a grainy texture.
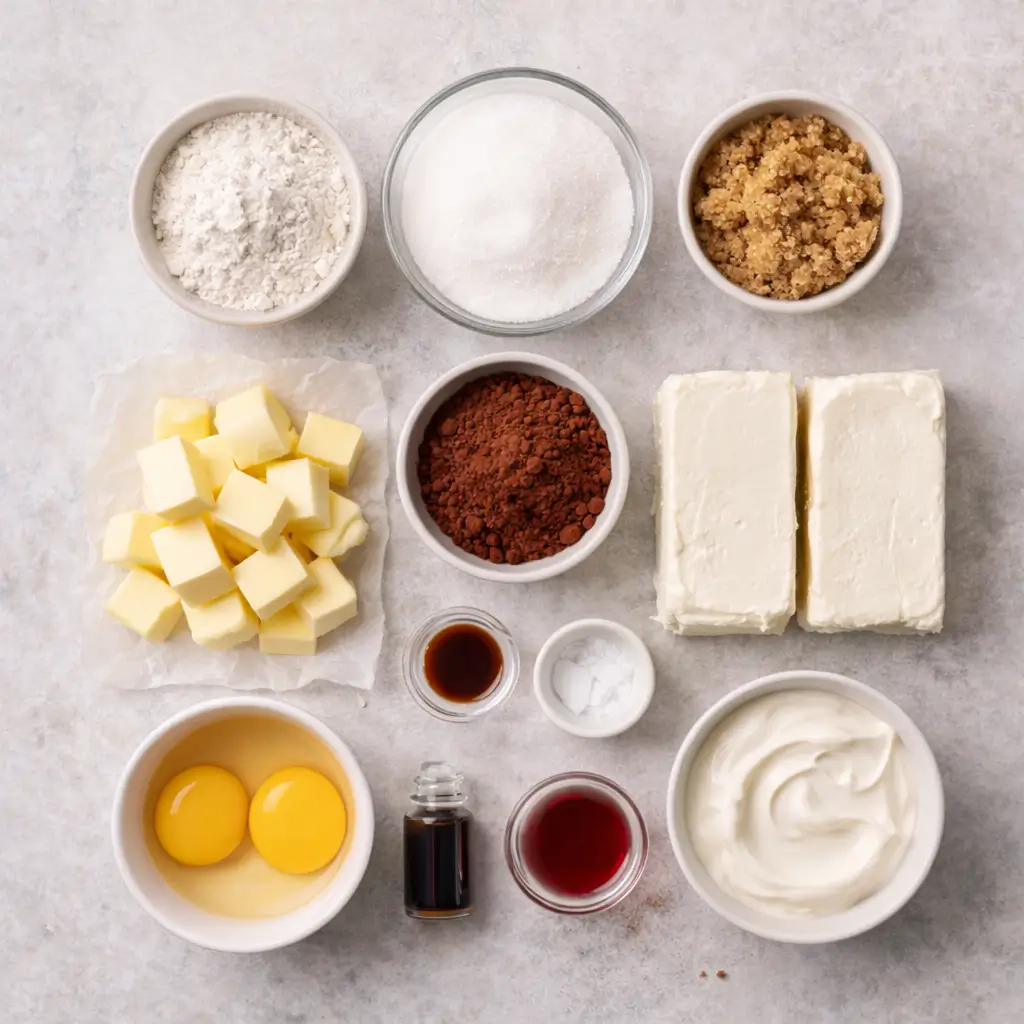
Exact Ingredient Quantities (US + Metric)
Red Velvet Layer
- 1 cup (125 g) all-purpose flour
- 1 tablespoon unsweetened cocoa powder
- ½ teaspoon baking powder
- ¼ teaspoon salt
- ½ cup (113 g) unsalted butter, melted
- ¾ cup (150 g) granulated sugar
- 1 large egg, room temperature
- 1 teaspoon vanilla extract
- 1 tablespoon red food coloring
Cheesecake Layer
- 8 oz (225 g) full-fat cream cheese, softened
- ¼ cup (50 g) granulated sugar
- 1 large egg, room temperature
- 1 teaspoon vanilla extract
- ¼ cup (60 g) sour cream or heavy cream
Equipment You’ll Need
You do not need specialty tools.
Recommended:
- 8×8-inch (20×20 cm) square baking pan
- Parchment paper
- Mixing bowls
- Hand mixer or whisk
- Rubber spatula
Metal pans produce the cleanest edges. Glass pans work but may require extra baking time.
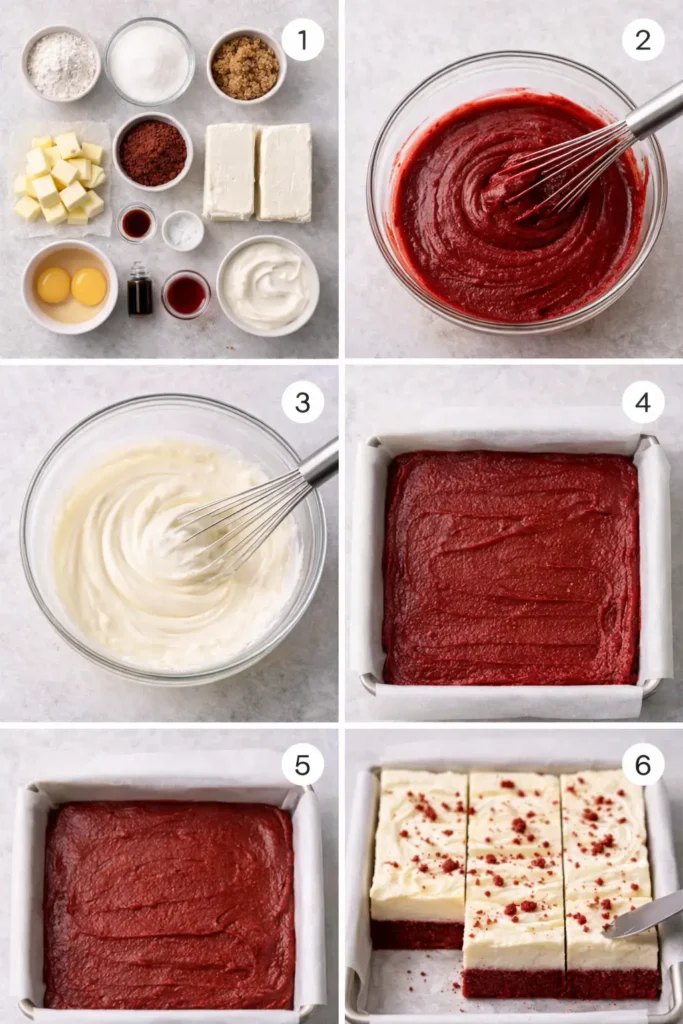
Step-by-Step Instructions
Step 1: Prepare the Pan
Line the baking pan with parchment paper. Leave overhang on two sides for easy removal. Lightly grease the parchment.
This prevents sticking and ensures clean slicing later.
Step 2: Make the Red Velvet Batter
In a bowl, whisk flour, cocoa powder, baking powder, and salt.
In another bowl, mix melted butter and sugar until glossy. Add egg, vanilla, and red food coloring. Stir until fully combined.
Fold the dry ingredients into the wet mixture. Mix gently until smooth. Do not overmix.
The batter should be thick and evenly colored.
Step 3: Press the Red Velvet Base
Spread the batter evenly into the prepared pan. Use an offset spatula to level the surface.
This layer forms the structural base. Take time to smooth it properly.
Step 4: Make the Cheesecake Layer
Beat softened cream cheese until completely smooth. Add sugar and beat again.
Add egg and vanilla. Mix just until incorporated. Finally, mix in sour cream or heavy cream.
The mixture should be silky and pourable.
Step 5: Assemble the Layers
Pour the cheesecake mixture over the red velvet base. Spread gently to avoid disturbing the bottom layer.
For a subtle swirl, drag a knife lightly across the surface.
Step 6: Bake
Bake at 325°F (165°C) for 35–40 minutes.
The edges should be set. The center should have a slight jiggle.
Avoid overbaking. Overbaking causes dryness and cracking.
Step 7: Cool and Chill
Cool the bars at room temperature for 1 hour. Then refrigerate for at least 3 hours.
Chilling is essential for clean slicing.
Step 8: Slice and Serve
Lift the bars from the pan using parchment overhang. Use a sharp knife wiped clean between cuts.
Cut into 12 or 16 squares.
Texture and Flavor Profile
These bars are:
- Fudgy at the base
- Creamy in the center
- Balanced in sweetness
- Rich without heaviness
The cocoa flavor is subtle, not chocolate-dominant. The cheesecake layer provides contrast and structure.
Common Mistakes to Avoid
Overmixing the Cheesecake
This incorporates too much air and causes cracking.
Using Cold Cream Cheese
Cold cream cheese creates lumps that never fully smooth.
Overbaking
The cheesecake continues to set while cooling.
Skipping Chill Time
Warm bars will crumble and smear.
How to Get Clean Layers Every Time
- Use room-temperature ingredients
- Level the red velvet base evenly
- Pour cheesecake slowly
- Chill thoroughly before slicing
For bakery-sharp edges, freeze for 20 minutes before slicing.
Storage Instructions
Refrigerator
Store bars in an airtight container for up to 5 days.
Freezer
Freeze sliced bars for up to 2 months. Wrap individually.
Thaw overnight in the refrigerator.
Make-Ahead Tips
These bars improve with time.
Best schedule:
- Bake one day ahead
- Chill overnight
- Slice before serving
This makes them perfect for events.
Variations and Add-Ins
Chocolate Chip Red Velvet Cheesecake Bars
Add mini chocolate chips to the base.
Oreo Swirl Bars
Add crushed cookies only to the cheesecake layer.
White Chocolate Drizzle
Drizzle melted white chocolate after chilling.
Valentine’s Day Version
Use heart-shaped cutters after chilling.
Serving Suggestions
Serve:
- Plain
- With whipped cream
- With fresh berries
- With a dusting of powdered sugar
These bars pair well with coffee or milk.
Scaling the Recipe
For a 9×13-inch pan:
- Double all ingredients
- Bake 40–45 minutes
For mini bars:
- Use a muffin pan
- Reduce bake time to 20–22 minutes
Why These Bars Are Perfect for Pinterest and Blogs
- Strong color contrast
- Clean layers
- Multiple image angles
- Sliceable format
They perform well in:
- Valentine’s boards
- Holiday dessert boards
- Cheesecake collections
Frequently Asked Questions
Can I use gel food coloring?
Yes. Use a smaller amount due to higher concentration.
Can I make this gluten-free?
Yes. Use a 1:1 gluten-free flour blend.
Can I reduce sugar?
Slightly, but do not reduce by more than 20%.
Do these crack?
Rarely, if baked gently and not overmixed.
Final Thoughts
Red Velvet Cheesecake Bars are the perfect balance between indulgent and practical. They deliver the flavor of a classic layered dessert with the simplicity of bar baking. Clean layers, rich texture, and bold color make them ideal for both special occasions and everyday treats.
If you want a dessert that looks impressive, slices beautifully, and stores well, this recipe belongs in your collection.