
Easter Nests recipe is one of the easiest and most festive desserts you can prepare for spring celebrations. Indeed, this no-bake treat combines simplicity, texture, and visual appeal. Moreover, it requires only a few ingredients and minimal preparation time. Therefore, it is perfect for busy families, beginners, and anyone seeking a quick holiday dessert.
In addition, this recipe is highly versatile. You can customize flavors, toppings, and shapes easily. Consequently, it appeals to both children and adults. Furthermore, it creates a fun cooking activity for kids during Easter.
Why You Will Love This Easter Nests Recipe
First, this recipe is extremely quick. You can prepare it in less than 20 minutes. Then, you only need to let it set.
Second, it is a no-bake dessert. Therefore, you avoid using the oven, which simplifies the process.
Third, it uses simple ingredients. Most items are already in your kitchen.
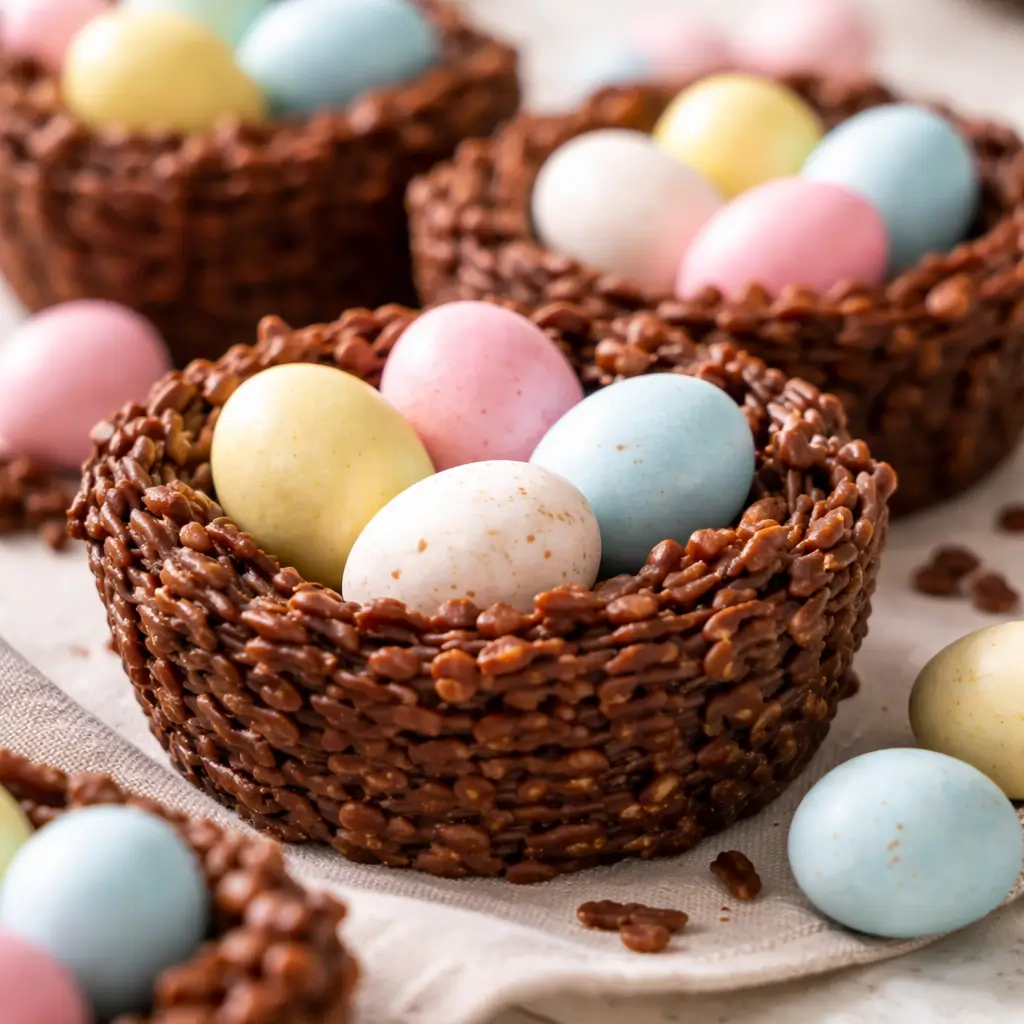
Moreover, it is visually appealing. The nests resemble real bird nests, which makes them perfect for Easter tables.
Finally, it is highly customizable. You can change chocolate types, cereals, and decorations.

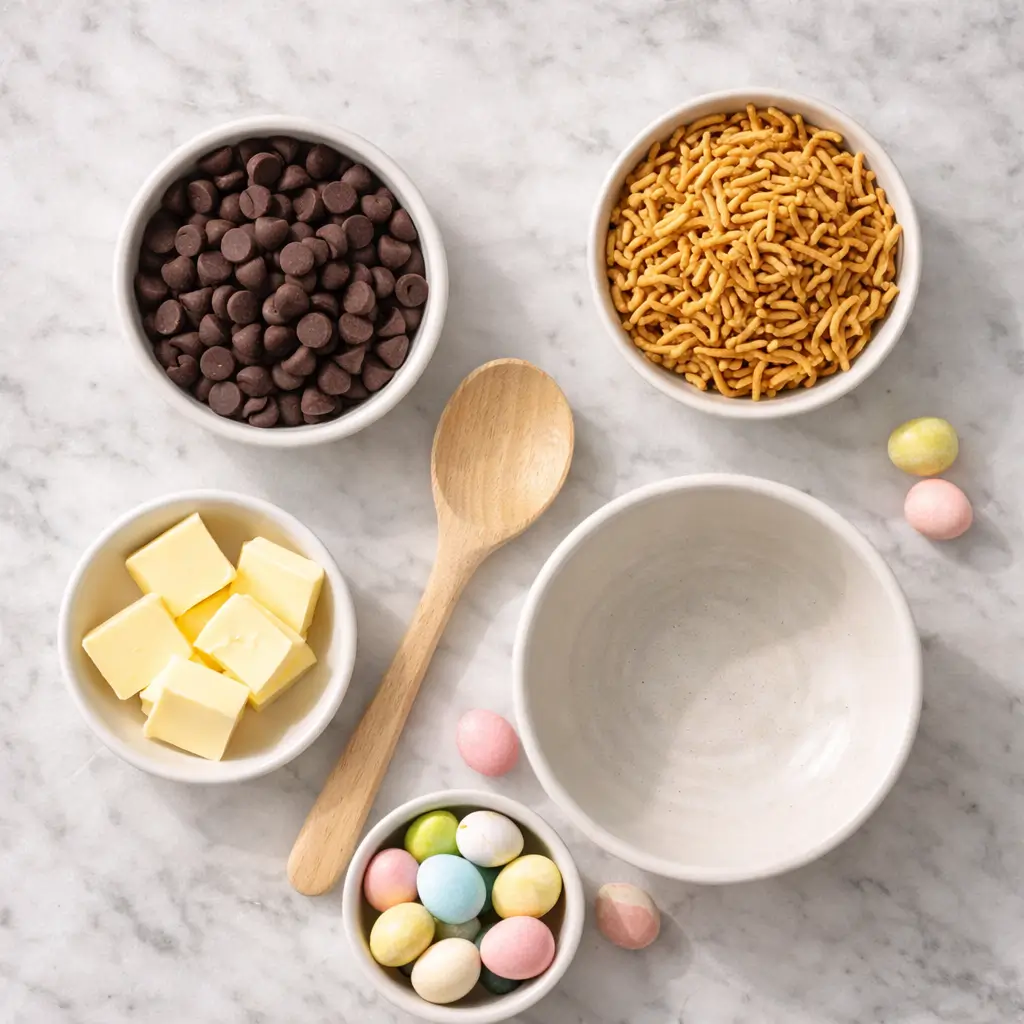
Ingredients Overview
Let us now describe the ingredients in detail.
Main Ingredients
- 200 g chocolate (milk, dark, or semi-sweet)
- 2 tablespoons butter
- 3 cups crispy cereal (cornflakes or chow mein noodles)
- 1 cup mini candy eggs
Optional Additions
- 1 teaspoon vanilla extract
- 1 tablespoon peanut butter
- shredded coconut (for texture)
- crushed nuts
Ingredient Details and Substitutions
Chocolate
Chocolate is the base of this recipe. Therefore, its quality matters.
- Milk chocolate gives a sweeter flavor
- Dark chocolate provides a richer taste
- Semi-sweet balances both
You can also use dairy-free chocolate if needed.
Butter
Butter improves texture and shine. However, you can replace it with coconut oil.
Cereal
Crispy cereal creates the nest structure.
- Cornflakes give a classic look
- Chow mein noodles create a more realistic nest
Candy Eggs
Candy eggs add color and decoration. You can also use:
- chocolate mini eggs
- jelly beans
- pastel M&Ms
Equipment Needed
You do not need complex tools. Instead, prepare the following:
- large mixing bowl
- heatproof bowl
- saucepan (for double boiler)
- spoon or spatula
- muffin tin or baking tray
- parchment paper
Step-by-Step Instructions
Step 1: Melt the Chocolate
First, chop the chocolate into small pieces. Then, place it in a heatproof bowl.
Next, melt it using a double boiler method. Stir continuously until smooth.
Alternatively, use a microwave. Heat in 30-second intervals while stirring.
Afterward, add butter and mix until fully melted.
Step 2: Add Flavor (Optional)
At this stage, you can add vanilla extract or peanut butter.
Then, mix thoroughly to ensure a smooth texture.
Step 3: Mix with Cereal
Now, add the crispy cereal into the melted chocolate.
Then, gently fold until all pieces are coated evenly.
Be careful not to crush the cereal. Otherwise, you will lose texture.
Step 4: Shape the Nests
Next, spoon the mixture into a muffin tin or onto parchment paper.
Then, use the back of a spoon to create a small indentation in the center.
This indentation forms the nest shape.
Step 5: Add Candy Eggs
Immediately place candy eggs into the center of each nest.
Press them gently so they stick.
Step 6: Let Them Set
Finally, allow the nests to cool at room temperature.
Alternatively, refrigerate for faster setting.
After 30–60 minutes, they will become firm.

Tips for Perfect Easter Nests
Use Good Chocolate
High-quality chocolate improves both taste and texture.
Avoid Overheating
Overheated chocolate becomes grainy. Therefore, melt gently.
Work Quickly
The mixture hardens fast. Thus, shape nests immediately.
Use Muffin Tins
Muffin tins help create uniform shapes.
Customize Decorations
You can add coconut or sprinkles for extra texture.
Variations of Easter Nests Recipe
1. Peanut Butter Easter Nests
Add peanut butter to the melted chocolate.
This creates a richer and creamier flavor.
2. White Chocolate Nests
Replace chocolate with white chocolate.
Then, add pastel decorations for a lighter look.
3. Coconut Nests
Mix shredded coconut with cereal.
This enhances texture and adds a tropical flavor.
4. Healthy Version
Use dark chocolate and low-sugar cereal.
Also, replace candy eggs with dried fruits.
5. Vegan Version
Use dairy-free chocolate and coconut oil.
Ensure all decorations are vegan-friendly.
Serving Suggestions
You can serve Easter nests in many ways.
- Place them on a decorative platter
- Serve individually on dessert plates
- Add them to a dessert table
- Use them as edible decorations
Moreover, they pair well with:
- coffee
- tea
- milk
Storage and Shelf Life
Room Temperature
Store in an airtight container for up to 3 days.
Refrigerator
Store for up to one week.
Freezer
You can freeze them for up to one month.
However, allow them to thaw before serving.
Common Mistakes to Avoid
Overmixing
Overmixing crushes the cereal. Therefore, fold gently.
Too Much Chocolate
Excess chocolate makes nests heavy. Use balanced proportions.
Skipping the Indentation
Without shaping, they will not resemble nests.
Using Wet Ingredients
Moisture ruins chocolate texture. Keep tools dry.
Nutritional Information (Approximate)
| Component | Value per Nest |
|---|---|
| Calories | 120–150 kcal |
| Carbohydrates | 15 g |
| Fat | 7 g |
| Protein | 2 g |
Kid-Friendly Activity
This recipe is perfect for children.
First, it is safe because it requires no baking.
Second, kids enjoy shaping nests.
Third, decorating with candy is fun.
Therefore, it becomes a creative family activity.
Creative Presentation Ideas
Mini Nest Basket
Arrange nests in a basket with decorative grass.
Easter Dessert Board
Combine nests with cookies and chocolates.
Gift Packaging
Place nests in small boxes as edible gifts.
Frequently Asked Questions
Can I make Easter nests ahead of time?
Yes. You can prepare them one or two days in advance.
Can I use different cereals?
Yes. However, choose crispy types for best texture.
How do I prevent sticking?
Use parchment paper or silicone molds.
Can I use microwave instead of double boiler?
Yes. Heat gradually and stir frequently.
Why are my nests too soft?
They may not be fully set. Refrigerate longer.
Advanced Tips for Better Results
Texture Balance
Use a ratio of 1:3 (chocolate to cereal). This ensures structure.
Visual Appeal
Use colorful candy eggs for contrast.
Flavor Layering
Add a pinch of salt to enhance sweetness.
Why This Recipe Works
This recipe combines three key elements:
- Fat (chocolate and butter)
- Crunch (cereal)
- Sweetness (candy eggs)
Therefore, it creates a balanced dessert.
Moreover, the structure forms naturally as chocolate hardens.
Scaling the Recipe
You can easily adjust quantities.
For 2 servings
- 100 g chocolate
- 1.5 cups cereal
For 6 servings
- 300 g chocolate
- 4.5 cups cereal
Easter Nests for Special Diets
Gluten-Free
Use gluten-free cereal.
Dairy-Free
Use plant-based chocolate.
Low Sugar
Choose dark chocolate and sugar-free candy.
Pairing Ideas
Easter nests pair well with:
- fruit salads
- yogurt desserts
- lemon cakes
Thus, they complement a full dessert menu.
Final Thoughts
Easter Nests recipe is simple, fast, and visually appealing. Moreover, it suits all skill levels. Therefore, it is ideal for festive occasions.
In addition, its flexibility allows endless variations. Consequently, you can adapt it to your taste and dietary needs.
Finally, it creates a joyful experience for families and guests. Thus, it becomes more than just a dessert—it becomes a tradition.