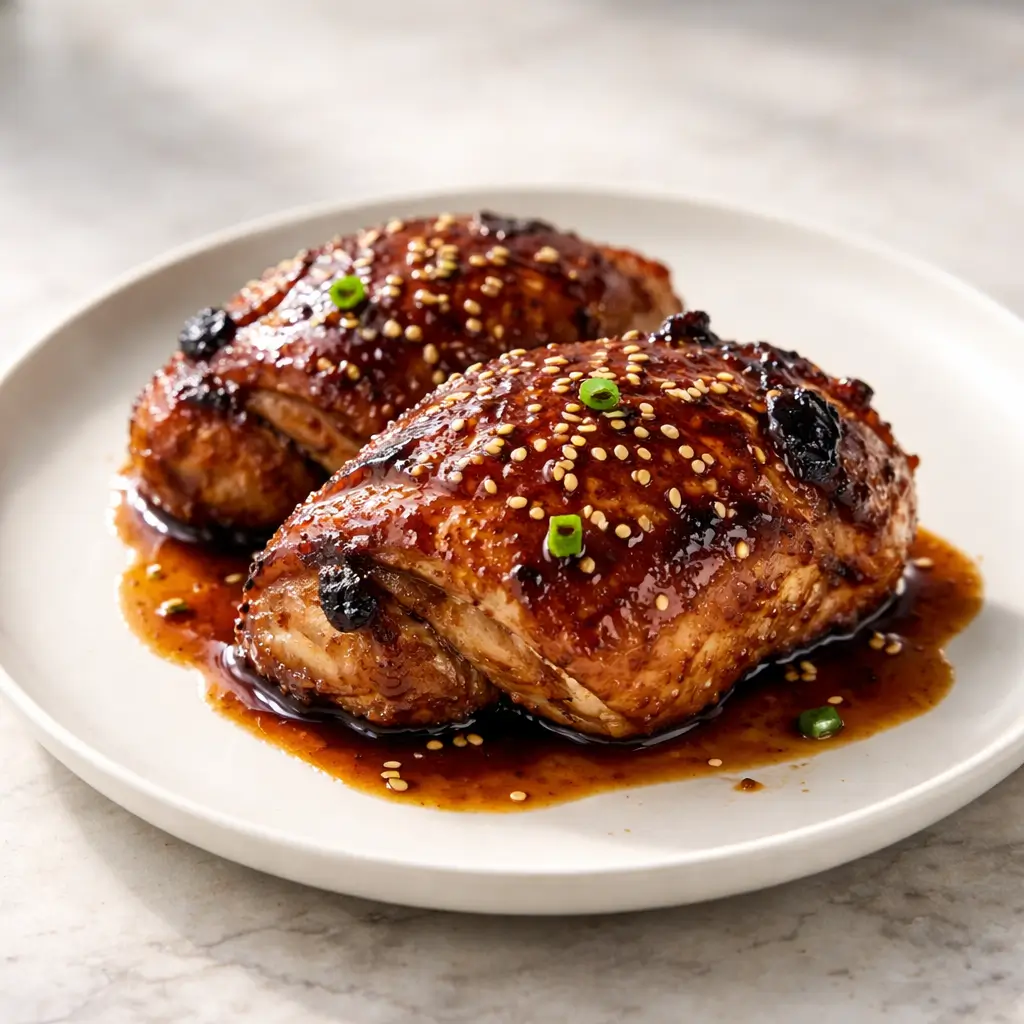
Baked Teriyaki Chicken is one of the easiest dinners you can prepare at home. Moreover, it delivers bold flavor with minimal effort. The sticky glaze, combined with juicy chicken, creates a perfect balance. Therefore, this recipe quickly becomes a weekly favorite.
In addition, this dish uses simple pantry ingredients. As a result, you can cook it anytime without stress. Even better, the oven does most of the work. So, you save time while still enjoying a rich and satisfying meal.
Why You’ll Love This Recipe
First, this recipe is incredibly simple. You only need a few ingredients. Then, the preparation takes less than 15 minutes.
Next, the flavor is outstanding. The teriyaki sauce caramelizes beautifully. Consequently, each bite feels rich and slightly sweet.
Also, this recipe is very versatile. You can use chicken thighs or breasts. In addition, you can adjust sweetness and saltiness easily.
Finally, it is perfect for meal prep. You can store leftovers for several days. Therefore, it fits busy schedules perfectly.
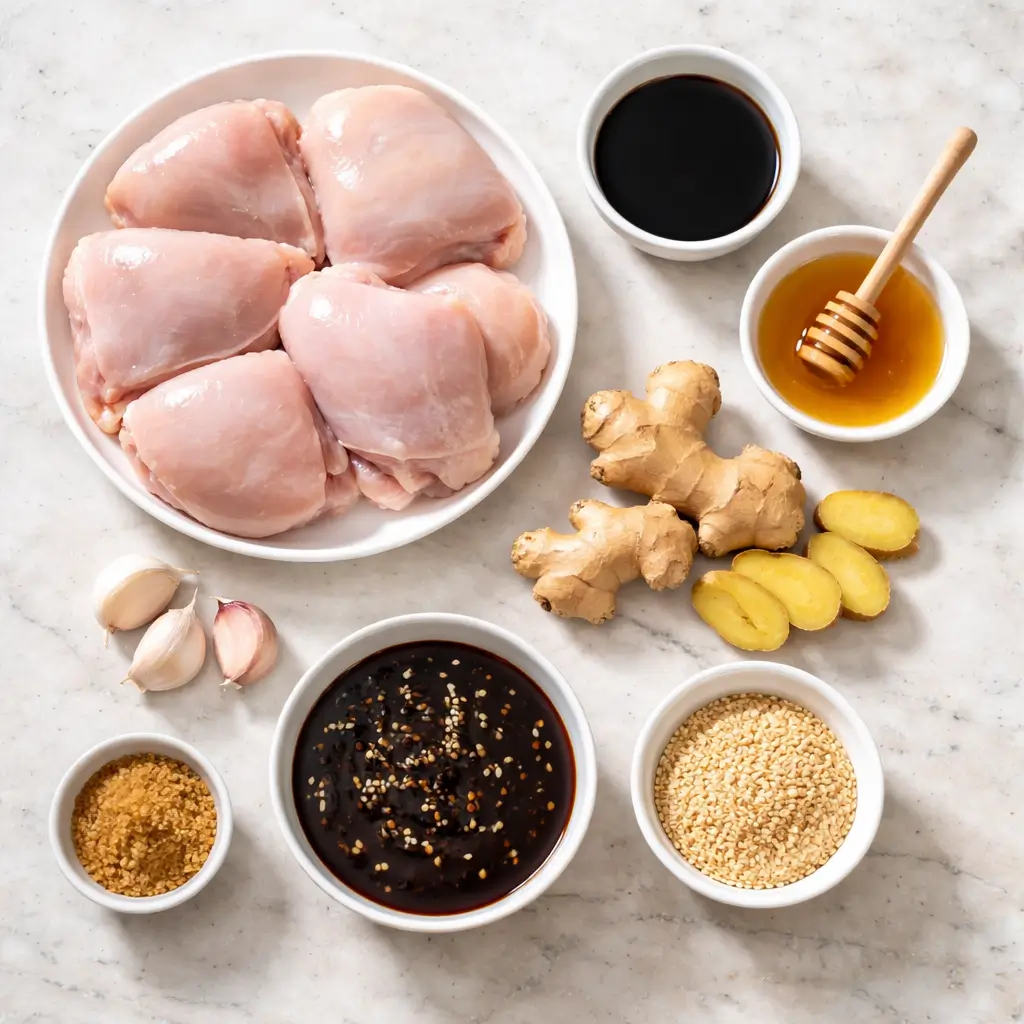
Ingredients (Detailed)
To achieve the best result, use high-quality ingredients. Each one plays an important role.
- Chicken thighs (bone-in or boneless)
They remain juicy during baking. Therefore, they are ideal for this recipe. - Soy sauce
It provides the salty base. Use low sodium if needed. - Honey or brown sugar
It adds sweetness. Moreover, it helps caramelization. - Garlic (fresh, minced)
It enhances depth of flavor. - Fresh ginger (grated)
It adds warmth and a slight spice. - Rice vinegar
It balances sweetness with acidity. - Cornstarch (optional)
It thickens the sauce. - Sesame seeds
They add texture and visual appeal. - Water
It adjusts sauce consistency.
Substitutions
Sometimes, you may not have all ingredients. Fortunately, this recipe remains flexible.
- Replace honey with maple syrup.
- Use chicken breasts instead of thighs.
- Swap rice vinegar with apple cider vinegar.
- Use garlic powder if fresh garlic is unavailable.
However, keep soy sauce as the base. It defines the dish.
Tips for Perfect Results
First, always pat the chicken dry. This helps better caramelization.
Next, do not overcrowd the baking dish. Otherwise, the chicken will steam instead of bake.
Also, baste the chicken during cooking. This step enhances flavor.
Finally, let the chicken rest for a few minutes. Consequently, juices redistribute evenly.
Variations
You can easily adapt this recipe.
- Add chili flakes for heat.
- Include pineapple juice for a tropical twist.
- Use boneless chicken for faster cooking.
- Add vegetables like bell peppers for a complete dish.
Thus, you can customize it according to your taste.
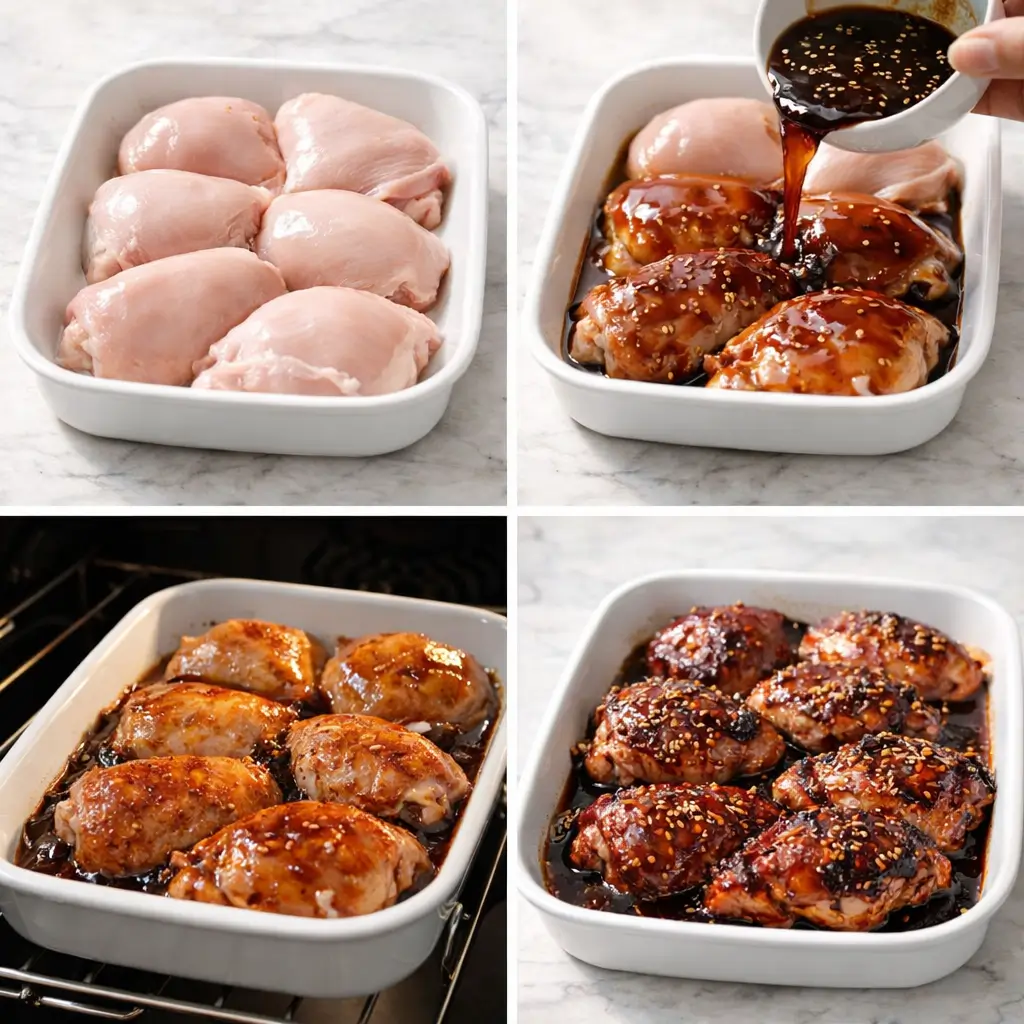
Step-by-Step Instructions (Detailed)
Step 1: Prepare the Chicken
First, preheat your oven to 200°C (400°F). Then, pat the chicken dry. This step is essential. It ensures a better glaze later.
Step 2: Prepare the Teriyaki Sauce
Next, combine soy sauce, honey, garlic, ginger, vinegar, and water. Stir well. Then, heat gently until combined.
If you want a thicker sauce, add cornstarch slurry. Stir continuously.
Step 3: Coat the Chicken
Place the chicken in a baking dish. Then, pour the sauce over it. Make sure each piece is well coated.
Step 4: Bake the Chicken
Bake for 30–40 minutes. Meanwhile, baste the chicken every 10 minutes. This step builds layers of flavor.
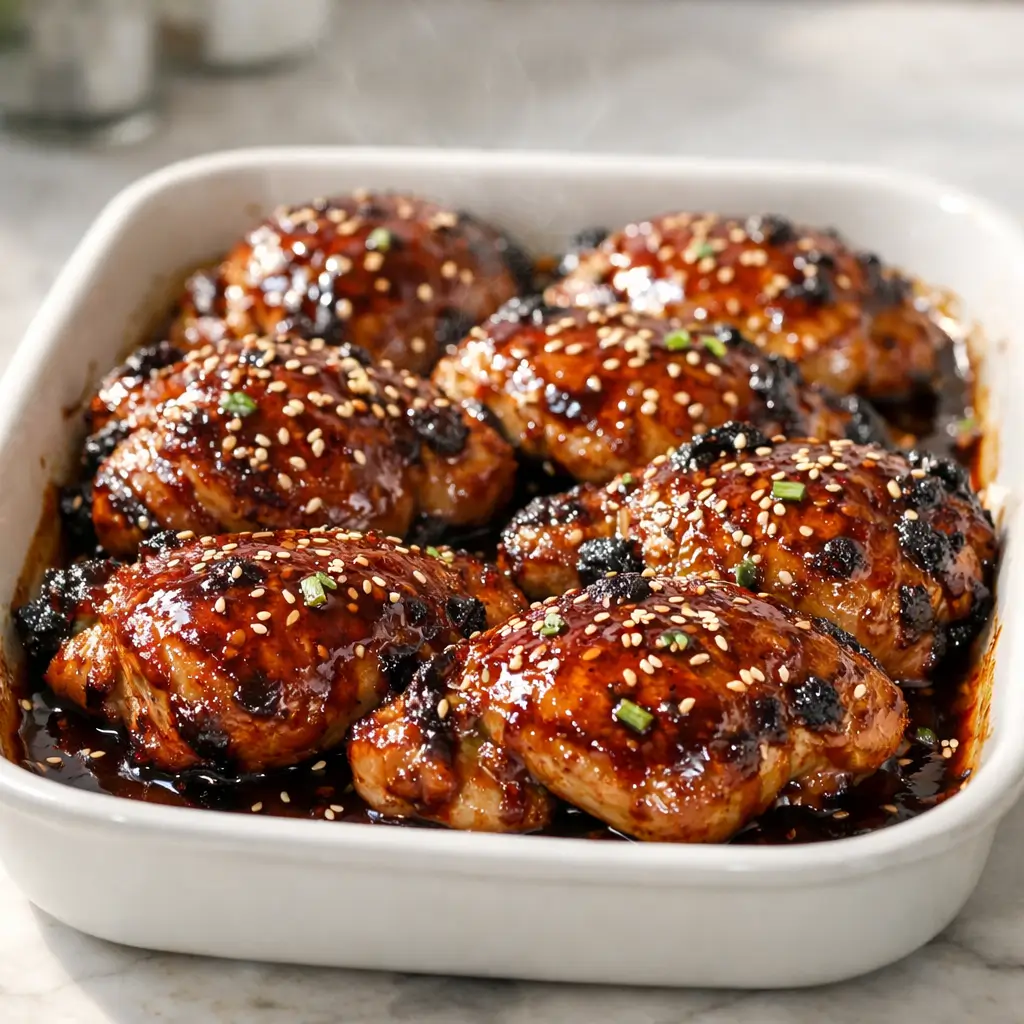
Step 5: Caramelize the Glaze
In the final 5 minutes, increase the heat slightly. This step creates a sticky glaze.
Watch carefully to avoid burning.
Step 6: Rest and Serve
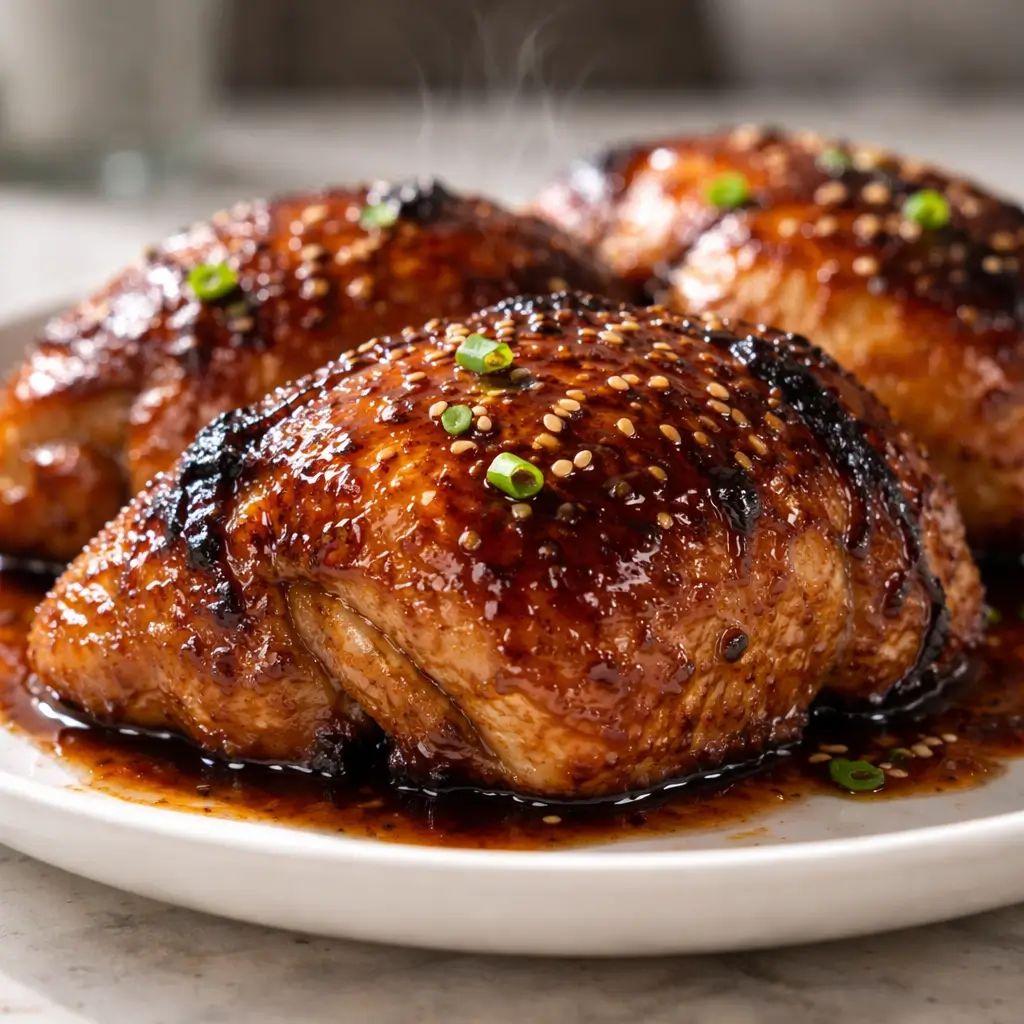
Remove the chicken from the oven. Let it rest for 5 minutes. Then, sprinkle sesame seeds on top.
Tips, Storage, and Meal Prep
Store leftovers in an airtight container. They last up to 4 days in the fridge.
For freezing, store for up to 2 months. Reheat gently to maintain texture.
Also, this recipe works perfectly for meal prep. Divide into portions for easy lunches.
Nutrition Information
Each serving provides balanced nutrition.
- Calories: ~420
- Protein: ~25g
- Carbohydrates: ~30g
- Fat: ~20g
- Sodium: ~650mg
Baked Teriyaki Chicken
Juicy baked chicken coated in a rich, sticky teriyaki glaze with bold flavor.
Ingredients
- 6 chicken thighs
- 1/2 cup soy sauce
- 1/4 cup honey
- 3 garlic cloves
- 1 tbsp fresh ginger
- 2 tbsp rice vinegar
- 1 tbsp cornstarch
- 1 tbsp sesame seeds
Instructions
- Preheat oven to 200°C.
- Mix sauce ingredients.
- Coat chicken with sauce.
- Bake for 35–40 minutes.
- Baste and caramelize glaze.
Notes
Use chicken thighs for best juiciness. Adjust sweetness as needed.
Nutrition Information
FAQs about Baked Teriyaki Chicken
Can I use chicken breast instead of chicken thighs?
How do I get a thick, sticky teriyaki glaze?
Can I prepare this recipe ahead of time?
Is Baked Teriyaki Chicken freezer-friendly?
What is the best way to reheat leftovers?
Can I make this recipe less salty or less sweet?
Do I need to marinate the chicken?
Can I add vegetables to this recipe?
Why is my sauce not caramelizing properly?
Conclusion
Baked Teriyaki Chicken is simple, flavorful, and highly satisfying. Moreover, it fits any schedule. Whether for a quick dinner or meal prep, it delivers consistent results.
Therefore, you should add this recipe to your rotation. Once you try it, you will make it again and again.