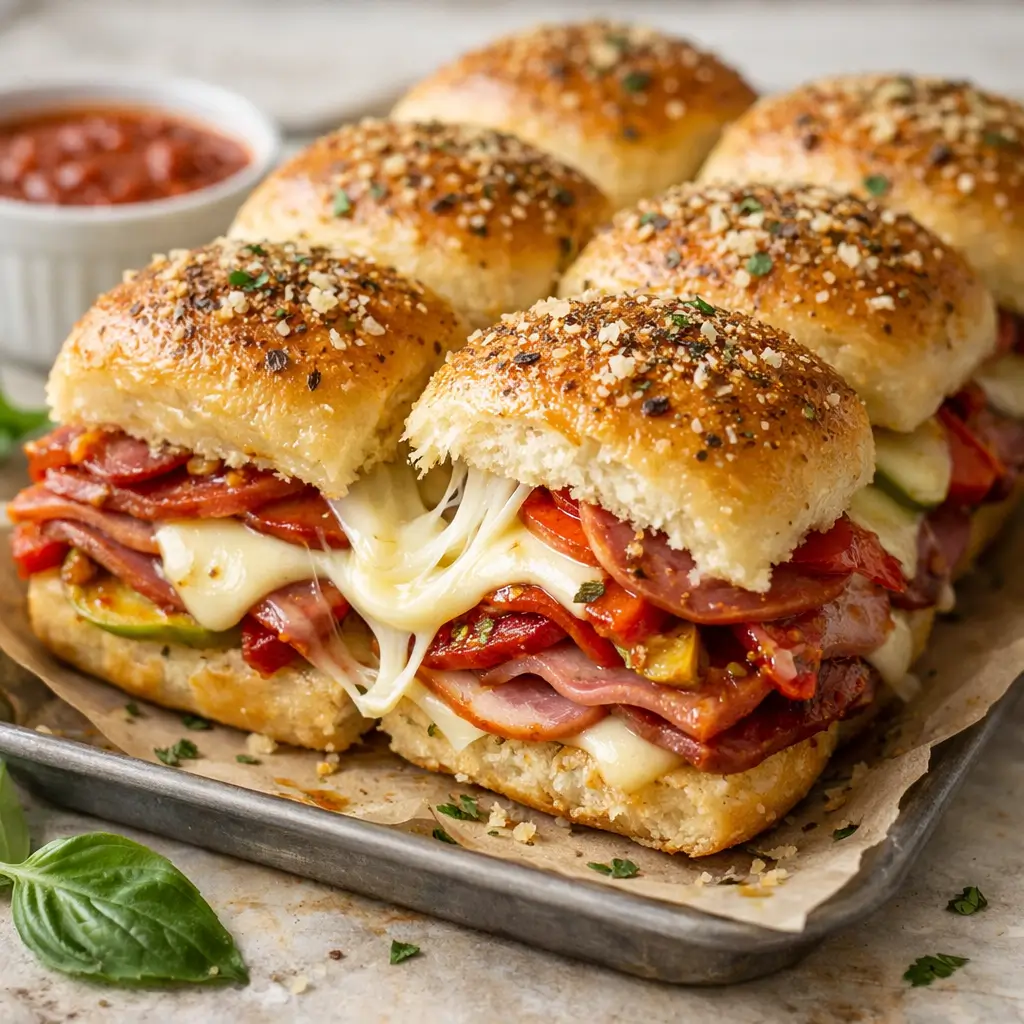
Hot Italian Sub Sliders are the perfect combination of bold Italian flavors, melty cheese, and soft, buttery bread. They bring everything people love about a classic Italian sub and transform it into a warm, pull-apart slider that works for parties, game days, family dinners, and casual gatherings. These sliders are easy to assemble, incredibly satisfying, and guaranteed to disappear fast once they hit the table.
This recipe is designed to deliver maximum flavor with minimal effort. Every layer plays a role, from the savory cured meats to the gooey cheese and the garlic-butter-brushed rolls. Whether you are hosting a crowd or simply craving a comforting baked sandwich, these Hot Italian Sub Sliders deliver every time.
In this guide, you will find everything you need to master this recipe. You will learn how to choose the right ingredients, layer the sliders properly, bake them to perfection, and customize them for different tastes. You will also find storage tips, make-ahead instructions, and serving ideas to help you get the most out of this dish.
Why Hot Italian Sub Sliders Are So Popular
Hot Italian Sub Sliders have earned their place as a crowd favorite for several reasons.
First, they are incredibly shareable. The slider format makes them easy to grab, serve, and enjoy without utensils. This makes them ideal for parties, potlucks, and casual gatherings.
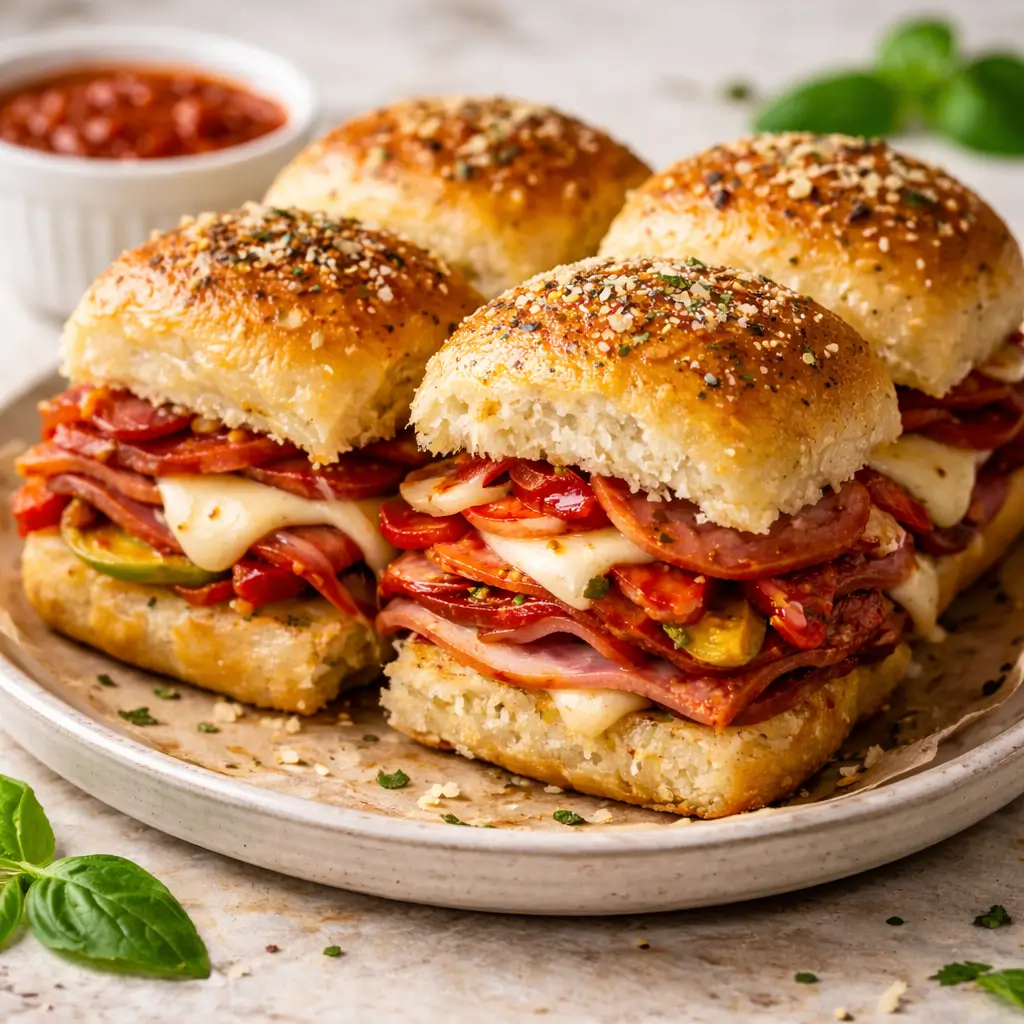
Second, they deliver bold flavor. Italian cured meats like salami and pepperoni bring salt and spice. Cheese adds richness. Peppers add brightness. Garlic butter ties everything together.
Third, they are flexible. You can adapt them to different preferences, spice levels, and dietary needs with simple swaps.
Finally, they are simple to make. You can assemble them quickly, bake them in one pan, and serve them hot with minimal cleanup.
What Makes a Great Italian Sub Slider
A great Hot Italian Sub Slider is all about balance. Each bite should include bread, meat, cheese, and seasoning in the right proportions.
The bread should be soft but sturdy. It needs to absorb flavor without falling apart.
The meats should be layered evenly. This ensures consistent flavor throughout the sliders.
The cheese should melt smoothly. It should bind the layers together without overpowering the other ingredients.
The toppings should add contrast. Peppers provide acidity and brightness to balance the richness.
The topping butter should enhance, not drown. Garlic butter and herbs should complement the filling.
When all these elements work together, the result is a slider that feels indulgent but not heavy.
Ingredients Overview and Their Roles
Every ingredient in this recipe has a purpose. Understanding each one will help you make better sliders.
Slider Rolls
Soft slider rolls or Hawaiian-style rolls work best. They are slightly sweet, which balances the salty meats. They also hold together well during baking.
Avoid crusty rolls. They do not absorb butter evenly and can dry out.
Italian Meats
A classic combination includes salami, pepperoni, and ham.
- Salami adds deep, savory flavor.
- Pepperoni brings spice and richness.
- Ham adds balance and a mild sweetness.
You can adjust the ratios to suit your taste.
Cheese
Provolone and mozzarella are ideal choices.
- Provolone offers sharpness and depth.
- Mozzarella provides stretch and creaminess.
Using both creates the best texture and flavor.
Peppers
Banana peppers and roasted red peppers are traditional.
- Banana peppers add tang and slight heat.
- Roasted red peppers add sweetness and color.
Drain them well to avoid soggy sliders.
Butter and Seasonings
Garlic butter brushed on top is essential. It adds richness and aroma.
Italian seasoning and grated Parmesan add a savory finish that crisps beautifully in the oven.
Hot Italian Sub Sliders: Exact Ingredients Quantities
Slider Base
- 12 slider rolls (about 12 oz / 340 g total)
- 6 slices provolone cheese (6 oz / 170 g)
- 6 slices of mozzarella cheese (6 oz / 170 g)
Italian Meats
- 6 slices salami (4 oz / 115 g)
- 6 slices pepperoni (3 oz / 85 g)
- 6 slices deli ham (5 oz / 140 g)
Toppings
- ½ cup banana pepper rings, drained (75 g)
- ½ cup roasted red pepper strips, drained and sliced (75 g)
Garlic Butter Topping
- 4 tbsp unsalted butter, melted (57 g)
- 2 cloves garlic, minced (6 g)
- 1 tsp Italian seasoning (1 g)
- ¼ tsp salt (1.5 g)
- ¼ tsp black pepper (0.5 g)
- ¼ cup finely grated Parmesan cheese (25 g)
Optional for Serving
- Marinara sauce, for dipping
- Fresh parsley or basil, chopped
Ingredient Notes (Helpful for Consistency)
- Use thin-sliced deli meats for better melting and even layering.
- Cheese slices should fully cover the meat layer without any gaps.
- Drain peppers thoroughly to prevent soggy sliders.
- Parmesan should be finely grated, not shredded, for even browning.
Choosing the Best Bread for Sliders
Bread choice can make or break this recipe.
Look for rolls that are:
- Soft and fluffy
- Evenly sized
- Connected in a slab
Connected rolls make assembly easier and help the sliders bake evenly.
If using Hawaiian rolls, keep in mind their sweetness. It pairs well with spicy meats but may not suit everyone.
If you prefer a more savory base, use classic white slider rolls.
Selecting and Preparing the Meats
Quality matters when it comes to cured meats.
Choose thinly sliced meats from the deli counter if possible. Thin slices melt into the cheese and create a cohesive bite.
Fold the meat slightly instead of laying it flat. This creates texture and prevents dense layers.
Avoid stacking meats too thickly. Too much meat can overpower the cheese and bread.
Cheese Selection and Melting Tips
Cheese is the glue that holds these sliders together.
Slice or shred the cheese evenly. Uneven cheese leads to uneven melting.
Place cheese both above and below the meat if you want extra melt and stability.
Covering the sliders with foil for part of the baking time helps the cheese melt before the tops brown.
Preparing the Peppers Properly
Peppers add brightness and balance.
Drain jarred peppers thoroughly. Excess liquid causes sogginess.
Pat them dry with paper towels if needed.
Distribute peppers evenly across the sliders to avoid overly tangy bites.
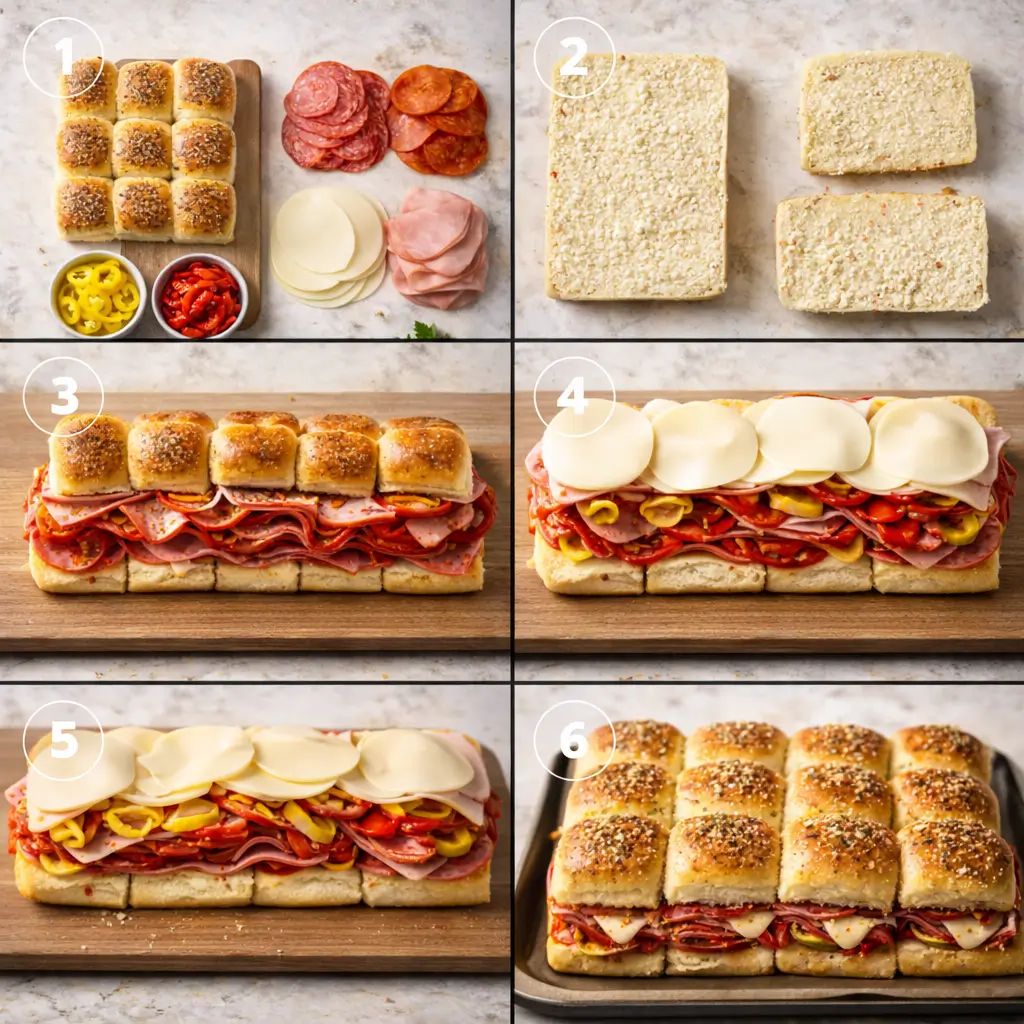
Step-by-Step Assembly Process
Step 1: Prepare the Pan
Line a baking dish with parchment paper or lightly grease it. This prevents sticking and makes cleanup easier.
Step 2: Slice the Rolls
Using a long serrated knife, slice the entire slab of rolls horizontally. Keep the rolls connected.
Place the bottom half in the baking dish.
Step 3: Layer the Meats
Add salami, pepperoni, and ham evenly across the rolls. Slightly fold the slices for texture.
Step 4: Add Cheese and Peppers
Layer cheese slices evenly over the meat. Add banana peppers and roasted red peppers.
Add another layer of cheese if desired.
Step 5: Add the Top Rolls
Place the top half of the rolls back on.
Step 6: Brush with Garlic Butter
Brush melted butter mixed with garlic over the tops. Sprinkle with Italian seasoning and Parmesan.
Baking Instructions and Timing
Preheat the oven to 350°F (175°C).
Cover the sliders loosely with foil. Bake for 15 minutes. This melts the cheese.
Remove the foil and bake for another 10–15 minutes. The tops should be golden and slightly crisp.
Let the sliders rest for 5 minutes before slicing. This helps the cheese set slightly.
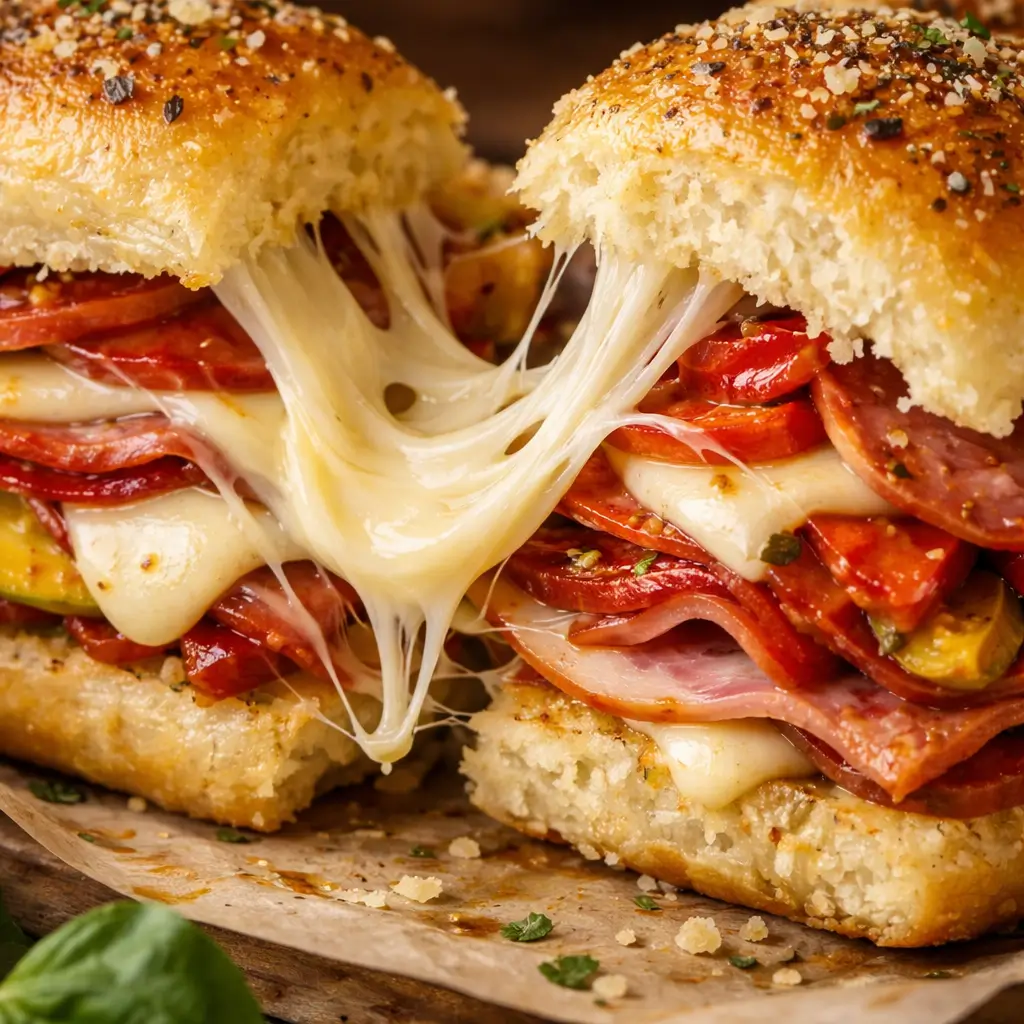
How to Get the Perfect Cheese Pull
For the best cheese pull:
- Use high-moisture mozzarella.
- Do not overbake.
- Serve the sliders hot.
- Slice gently with a sharp knife.
Pulling sliders apart instead of cutting individual ones enhances the visual effect.
Serving Suggestions
Hot Italian Sub Sliders pair well with simple sides.
Consider serving them with:
- Marinara sauce for dipping
- Italian dressing
- Pasta salad
- Potato chips
- Simple green salad
For parties, arrange them on a platter and garnish with fresh herbs.
Make-Ahead Instructions
These sliders are great for prepping ahead.
You can assemble them up to 24 hours in advance. Cover tightly and refrigerate.
When ready to bake, let them sit at room temperature for 20 minutes. Then bake as directed.
Storage and Reheating Tips
Store leftovers in an airtight container in the refrigerator for up to 3 days.
To reheat:
- Oven: Cover with foil and heat at 325°F until warm.
- Air fryer: Heat briefly for a crisp finish.
- Microwave: Use short intervals to avoid sogginess.
Variations and Customizations
Spicy Version
Add hot cherry peppers or crushed red pepper flakes.
Mild Version
Skip pepperoni and use more ham and mozzarella.
Deluxe Version
Add sautéed onions or mushrooms.
Turkey Italian Sliders
Substitute turkey for ham and salami.
Vegetarian Version
Use roasted vegetables and extra cheese.
Common Mistakes to Avoid
- Using soggy peppers
- Overloading with meat
- Skipping foil during baking
- Cutting immediately after baking
- Using dry bread
Avoiding these mistakes ensures perfect sliders every time.
Why This Recipe Works Every Time
This recipe balances flavor, texture, and simplicity.
It uses familiar ingredients in a reliable format.
The method ensures even melting and browning.
The result is a slider that tastes indulgent but feels approachable.
Frequently Asked Questions
Can I freeze these sliders?
Yes. Freeze baked sliders individually. Reheat in the oven.
Can I use different cheese?
Yes. Swiss or fontina work well.
Are these good for kids?
Yes. Use mild meats and cheese.
Can I double the recipe?
Absolutely. Use a larger pan.
Final Thoughts
Hot Italian Sub Sliders are more than just a party food. They are a versatile, satisfying dish that fits almost any occasion. With their melty cheese, savory meats, and buttery rolls, they deliver comfort and flavor in every bite.
This recipe is designed to be reliable, adaptable, and crowd-pleasing. Once you make them, they will likely become a regular part of your meal rotation.
Serve them hot. Watch them disappear. And enjoy every cheesy bite.