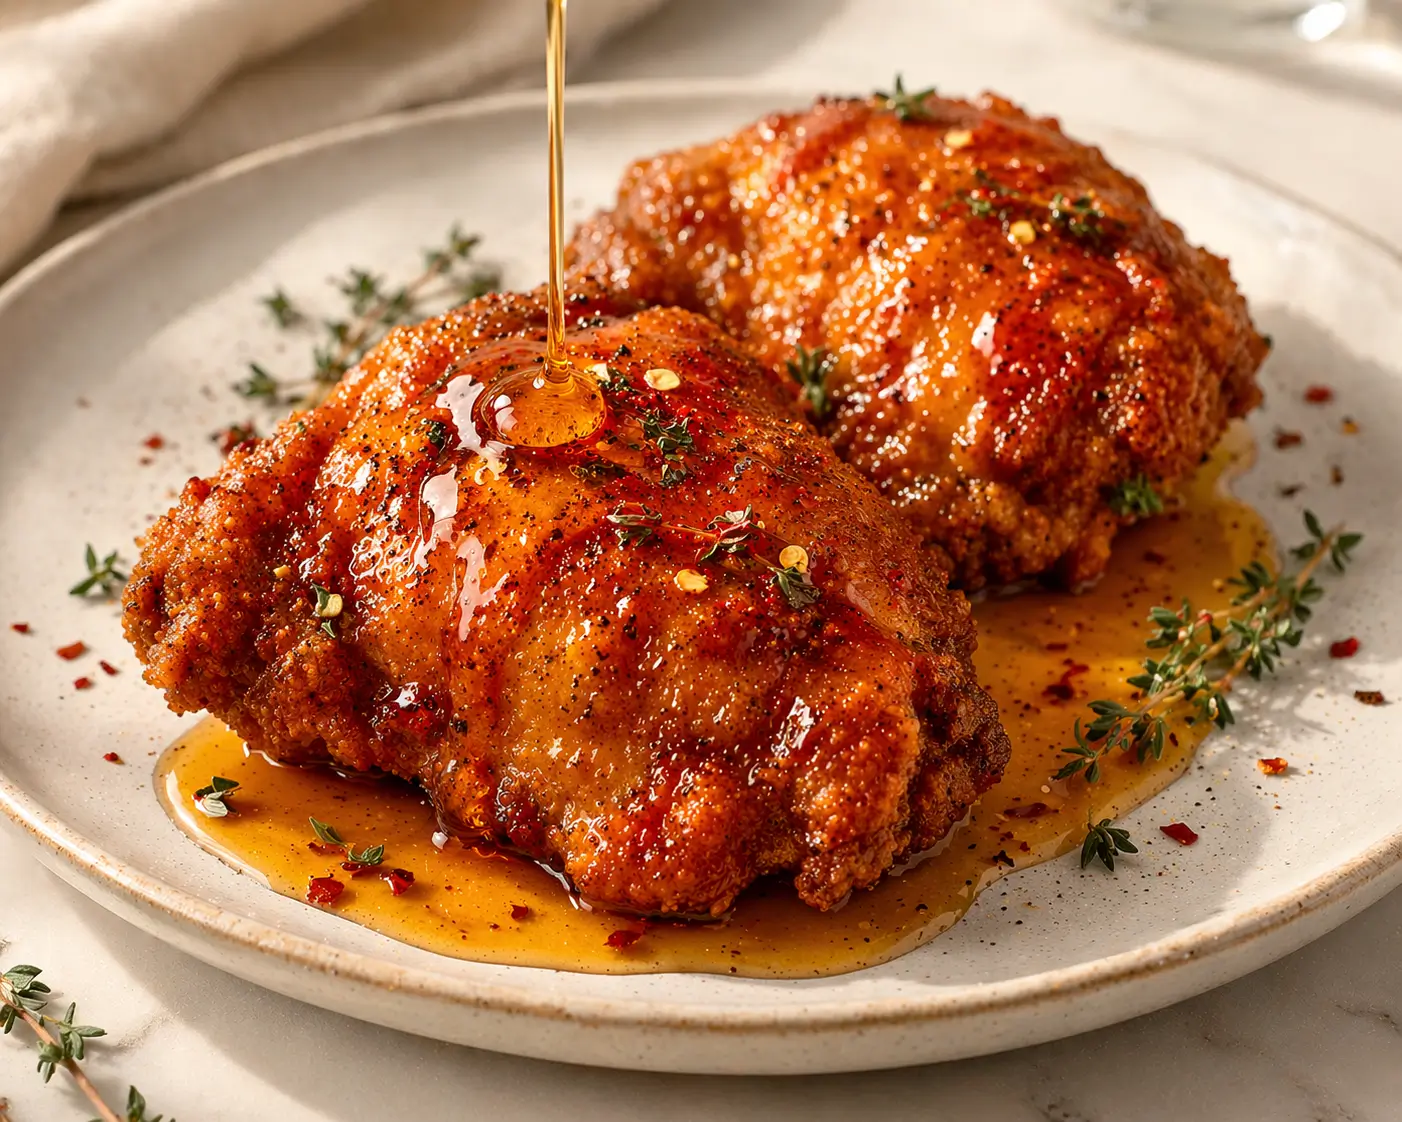
Crispy, golden, sticky, sweet, and just spicy enough to keep you reaching for the next piece. This baked crunchy hot honey chicken is the kind of recipe that makes you genuinely forget fried chicken exists.
You get a shatteringly crispy panko crust baked — not fried — in the oven, then finished with a glossy hot honey glaze that caramelizes into every crack and crevice. The result is sweet heat in every single bite, with a crunch that holds up even after the glaze goes on.
This is weeknight dinner that feels like a treat. Once you make it, it earns a permanent spot in your rotation.
Why You’ll Love This Recipe
If you love honey-glazed chicken dishes, you’ll also want to try these Honey Garlic Chicken Tenders — crispy, sticky, and equally impossible to stop eating.
Ingredients You’ll Need
Two components make this recipe — the crispy breading and the hot honey glaze. Both are simple. Both are essential.
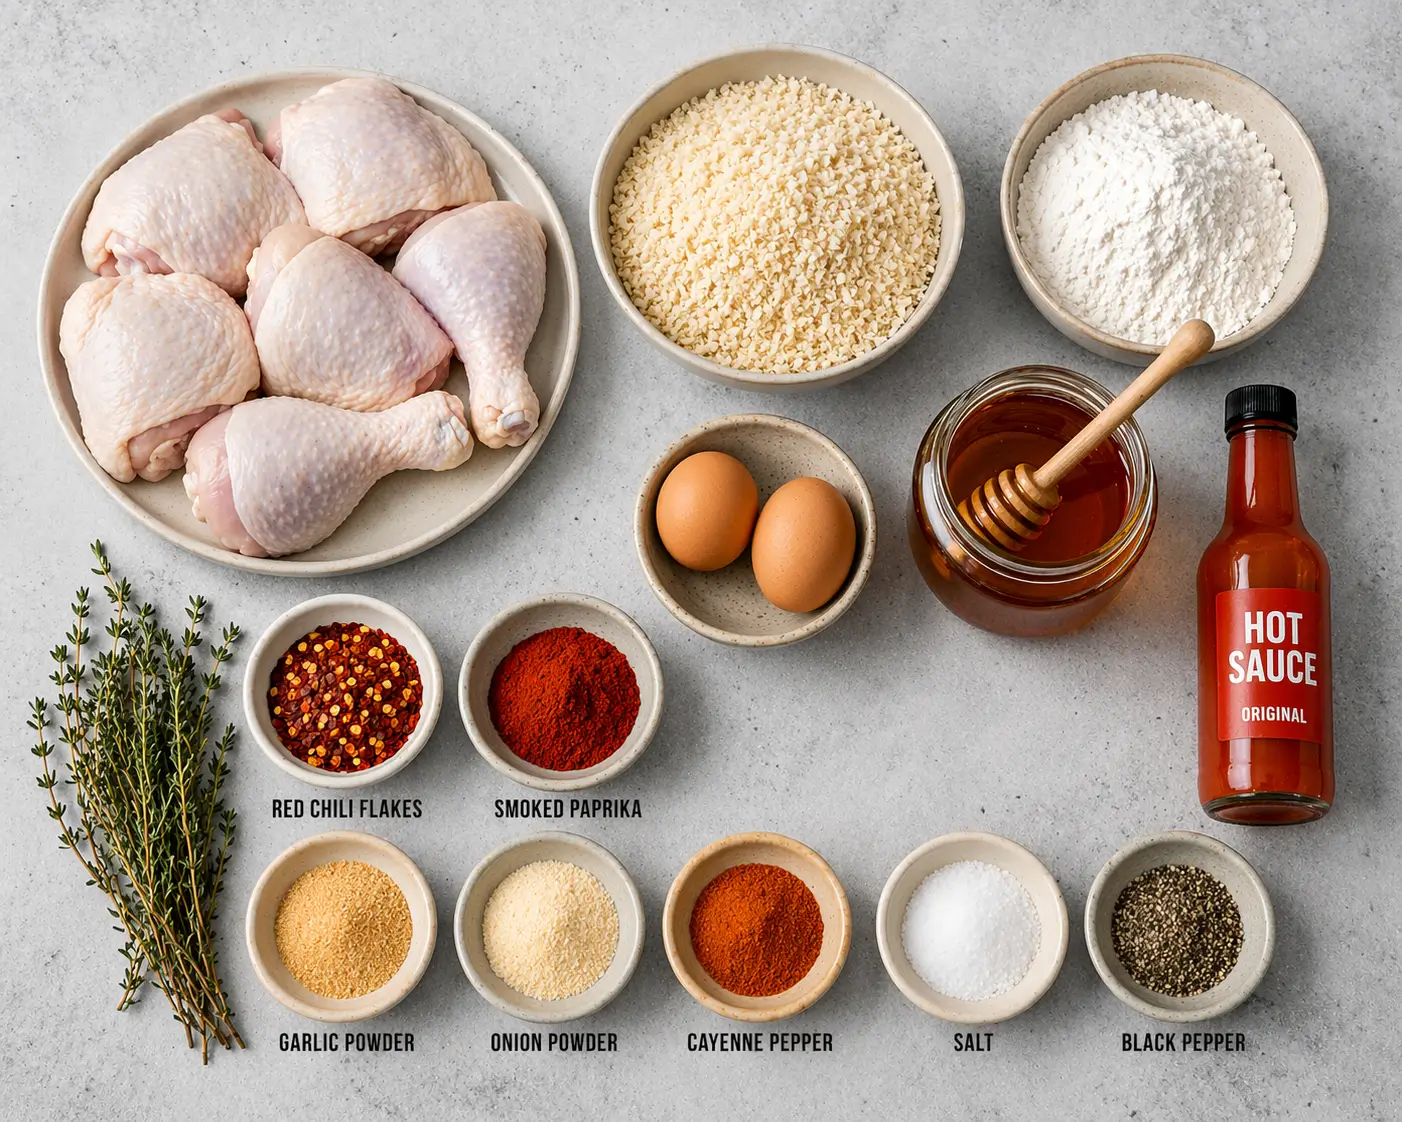
For the Chicken
- 8 bone-in skin-on chicken thighs — bone-in thighs stay incredibly juicy during the baking time needed to get the crust golden. You can use drumsticks too — same method, same result.
- 1 cup all-purpose flour — the first layer of the breading. Creates a dry base for the egg to adhere to.
- 2 large eggs, beaten — the glue between the flour and the panko.
- 1½ cups panko breadcrumbs — the secret to the crunch. Panko is coarser and lighter than regular breadcrumbs and creates a far crispier crust in the oven.
- 1 tsp smoked paprika
- 1 tsp garlic powder
- 1 tsp onion powder
- ½ tsp cayenne pepper — adjust to your heat preference.
- 1 tsp salt
- ½ tsp black pepper
- 2 tbsp olive oil — drizzled or sprayed over the breaded chicken before baking. This is what makes the panko go golden and crispy in the oven rather than staying pale and dry.
For the Hot Honey Glaze
- ⅓ cup honey — use a good quality runny honey. It forms the base of the glaze and gives you that gorgeous sticky finish.
- 2 tbsp hot sauce — Frank’s RedHot or your favorite brand. Adds tang and heat that balances the sweetness of the honey perfectly.
- 1 tbsp unsalted butter — gives the glaze a silky, glossy finish that clings to the chicken beautifully.
- 1 tsp red chili flakes — for extra visible heat and a little texture in the glaze.
- ½ tsp garlic powder
- Pinch of salt
To Finish
- Fresh thyme leaves — scattered over just before serving for color and a fresh herbal note.
- Flaky sea salt — a pinch over the top right before serving makes every flavor pop.
- Extra hot honey for drizzling — because more is always more with this glaze.
Boneless skinless thighs: Work great and reduce baking time by about 8–10 minutes. Keep a close eye on the internal temperature.
Chicken breasts: Butterfly them or pound to an even thickness so they cook at the same rate as the crust browns. Watch carefully — they dry out faster than thighs.
Gluten-free: Use a 1:1 gluten-free flour blend and gluten-free panko breadcrumbs. The result is virtually identical and just as crispy.
Milder version: Halve the cayenne and chili flakes and reduce the hot sauce to 1 tablespoon. The glaze stays sweet and flavorful with just a gentle background warmth.
How to Choose the Best Chicken for This Recipe
The cut you choose makes a real difference to the final result.
- Bone-in, skin-on thighs are the gold standard here. The bone insulates the meat from drying out during the longer baking time, and the skin adds an extra layer of flavor and moisture under the breading. They also have more surface area for the crust to cling to.
- Drumsticks are a great alternative. They look impressive, hold up beautifully to the breading and glaze, and kids love picking them up. Use the exact same method — just check the internal temperature at the 35-minute mark.
- Pat the chicken completely dry before breading. This is critical. Surface moisture makes the flour coating gummy rather than crisp and prevents the breading from adhering properly. Pat with paper towels and let the chicken air-dry on a rack for 10 minutes if you have time.
- Bring the chicken to room temperature before baking. Cold chicken straight from the fridge takes longer to cook through, which means the breading can over-brown before the meat is done. Pull it from the fridge 20 minutes before you start.
- Uniform-sized pieces bake more evenly. Try to choose thighs that are similar in size so everything is ready at the same time.
How to Make Baked Crunchy Hot Honey Chicken
Step 1 — Set Up Your Breading Station
Preheat your oven to 220°C (425°F). Line a large baking sheet with foil and place a wire rack on top. Spray or brush the rack lightly with oil — this prevents sticking and helps the bottom of the chicken crisp up rather than steam. Set up three shallow dishes in a row: dish one with the flour mixed with all the dry spices, dish two with the beaten eggs, dish three with the panko breadcrumbs.
Step 2 — Bread the Chicken
Pat each chicken piece completely dry with paper towels. Working one piece at a time, dredge it first in the seasoned flour, pressing firmly so it coats every surface. Shake off any excess. Dip it into the beaten egg, letting any excess drip off. Finally press it firmly into the panko breadcrumbs, turning to coat all sides and pressing the crumbs in so they adhere well. Place the breaded chicken on the prepared wire rack. Repeat with all pieces.
Step 3 — Oil and Bake
Drizzle or spray a thin, even layer of olive oil over every piece of breaded chicken. This is the step most people skip — don’t. The oil is what transforms the panko from pale and powdery to deeply golden and crunchy in the oven. Bake at 220°C (425°F) for 35–40 minutes, turning the chicken once at the halfway point, until the crust is deeply golden and the internal temperature reaches 74°C (165°F).
Step 4 — Make the Hot Honey Glaze
While the chicken is in its last 10 minutes of baking, make the glaze. Combine the honey, hot sauce, butter, chili flakes, garlic powder, and salt in a small saucepan over medium-low heat. Stir gently until the butter melts and everything comes together into a smooth, glossy glaze — about 2–3 minutes. Don’t boil it. Remove from heat and set aside. The glaze should be thick enough to coat the back of a spoon.
Step 5 — Glaze the Chicken
The moment the chicken comes out of the oven, brush the hot honey glaze generously over each piece using a pastry brush. Be liberal — you want the glaze to soak into every crack of the crust. For an extra sticky finish, return the glazed chicken to the oven for a final 3–4 minutes at the same temperature. Watch it closely — the honey can go from perfectly caramelized to burnt very quickly. Pull it when the glaze is bubbling and sticky.
Step 6 — Rest and Finish
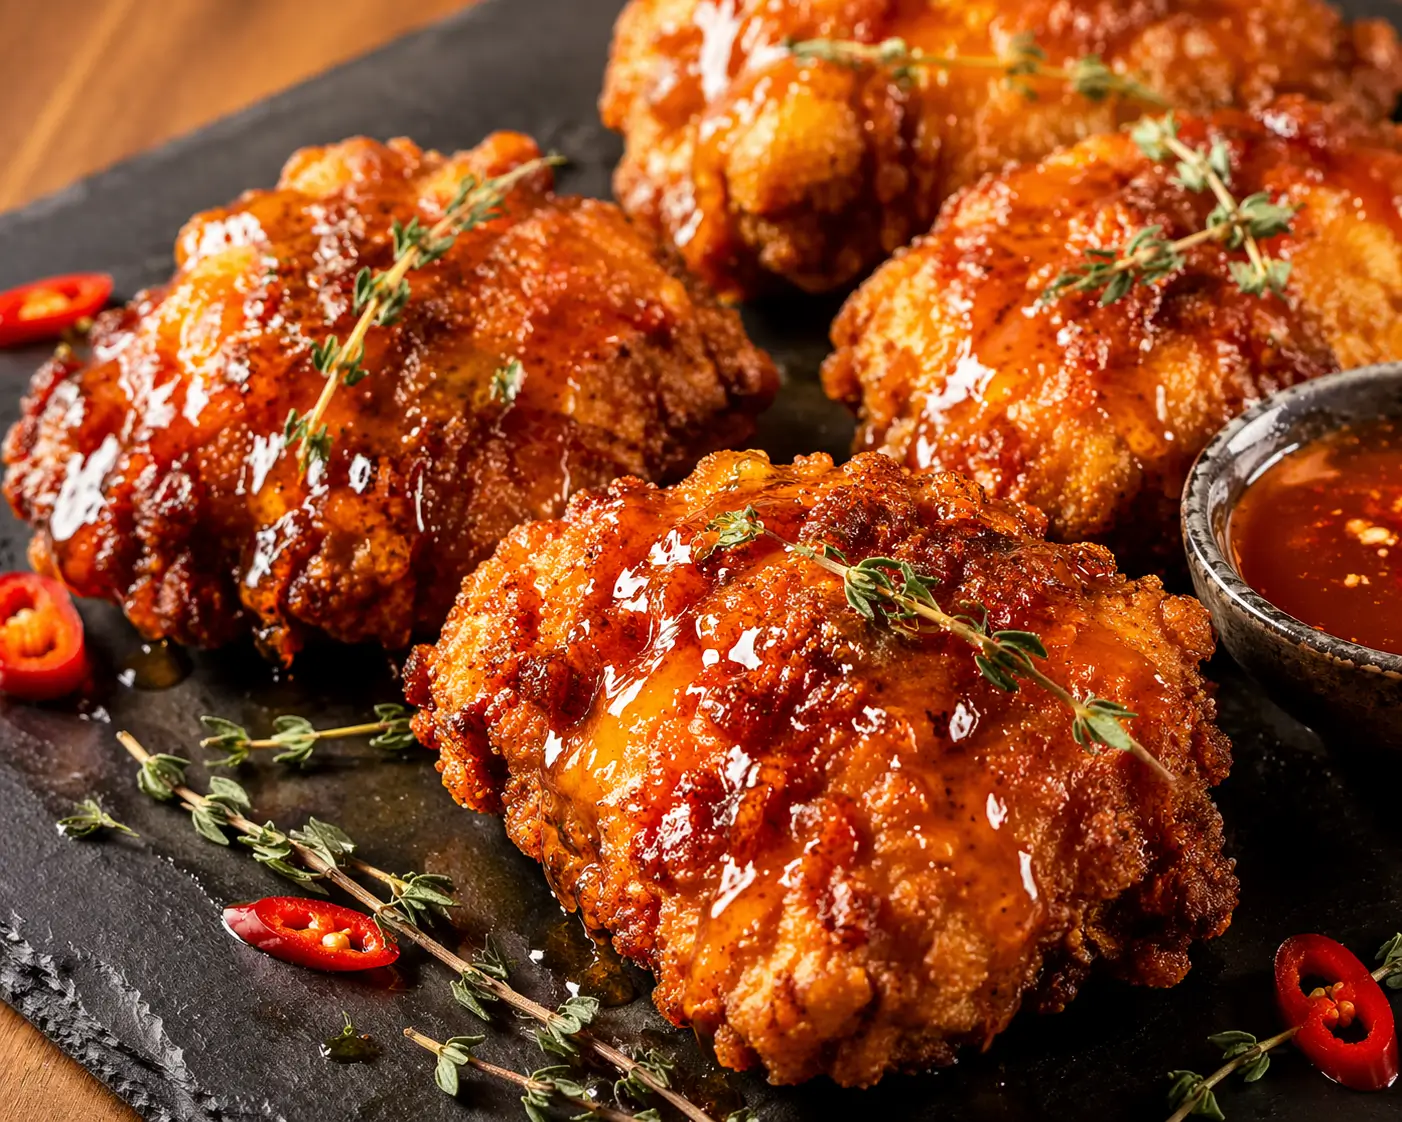
Let the chicken rest on the rack for 3–4 minutes before serving — this lets the glaze set slightly so it doesn’t slide off when you pick the pieces up. Scatter fresh thyme leaves and a pinch of flaky sea salt over the top. Drizzle with any remaining hot honey glaze right before bringing it to the table.
Step 7 — Serve Immediately
Serve straight from the rack for maximum crunch. The crust is at its absolute best in the first 10 minutes after glazing. Set out extra hot honey on the side for anyone who wants more heat — and trust us, they will want more.

Why This Recipe Works
Every technique here has a specific purpose.
- The three-step breading creates a proper crust. Flour — egg — panko is the classic sequence for a reason. The flour gives the egg something to grab onto. The egg gives the panko something to stick to. Skip any step and the crust slides off.
- Panko over regular breadcrumbs every time. Panko is made from crustless white bread and has a coarser, airier texture than regular breadcrumbs. In the oven, it crisps up dramatically rather than just browning. The difference in crunch is enormous.
- The oil spray is what makes it actually crispy. Without fat, panko in the oven just dries out. A thin coating of oil kickstarts the same browning reaction you’d get from frying — but in the oven.
- High oven temperature is essential. 220°C (425°F) is hot enough to crisp the panko quickly before the chicken has time to dry out. Lower temperatures mean longer baking time and a less crispy result.
- Glazing at the end preserves the crunch. Adding the hot honey glaze after baking rather than before means the crust has fully crisped up first. The glaze then coats the outside without penetrating and softening the breading underneath.
- The final blast in the oven caramelizes the glaze. Those 3–4 extra minutes after glazing turn the honey from a liquid coating into a sticky, caramelized shell that amplifies both the sweetness and the crunch.
Best Side Dishes to Serve With Hot Honey Chicken
You need sides that complement the sweet heat without competing with it.
Variations to Try
- Dairy-Free: Simply omit the butter from the hot honey glaze. The honey and hot sauce alone make a beautifully glossy, sticky glaze — the butter just adds extra richness. Use a dairy-free butter substitute if you prefer.
- Gluten-Free: Swap the all-purpose flour for a 1:1 gluten-free flour blend and use certified gluten-free panko breadcrumbs. The crunch is virtually identical.
- Extra Spicy Version: Double the cayenne in the breading, add a full teaspoon of chili flakes to the glaze, and use a hotter hot sauce like Tabasco or Crystal. Not for the faint-hearted — but absolutely incredible.
- Hot Honey Chicken Tenders: Use boneless skinless chicken breast strips instead of thighs. Reduce the baking time to 18–22 minutes. Same method, same glaze — check out our Honey Garlic Chicken Tenders for a similar approach that works brilliantly.
- Hot Honey Feta Chicken: Skip the panko breading and go a completely different direction — our Hot Honey Feta Chicken combines the same hot honey flavor with creamy feta for a totally different but equally stunning result.
- Air Fryer Version: Bread the chicken exactly as written. Air fry at 200°C (390°F) for 22–25 minutes for bone-in thighs, flipping halfway. Brush with glaze and air fry for a final 3 minutes. The crust comes out incredibly crispy in even less time.
Storage, Meal Prep & Reheating
Storing Leftovers
Store leftover chicken in an airtight container in the refrigerator for up to 3 days. The crust will soften as it sits — that’s expected. Reheating properly will bring most of the crunch back.
Freezing
You can freeze the breaded, baked chicken before glazing for up to 2 months. Freeze on a tray first until solid, then transfer to a freezer bag. Reheat from frozen at 200°C (400°F) for 20–25 minutes, then glaze and return to the oven for the final 3–4 minutes as normal.
Reheating
The oven is the only way to bring the crunch back. Place the chicken on a wire rack over a baking sheet and reheat at 200°C (400°F) for 12–15 minutes until hot throughout and the crust has crisped up again. The air fryer at 180°C (350°F) for 8–10 minutes is even better. Avoid the microwave — it steams the crust and makes it soggy.
Meal Prep Tips
The hot honey glaze keeps in a sealed jar in the fridge for up to 2 weeks — make a double batch and use it on everything. You can also bread the chicken up to 24 hours ahead and refrigerate uncovered on the wire rack. The uncovered rest actually helps the breading adhere better and dry out slightly, giving you an even crispier result when it hits the oven.
Common Mistakes to Avoid
- Skipping the wire rack. Baking directly on the tray traps steam under the chicken and makes the bottom crust soft and soggy. The wire rack is essential for all-over crunch.
- Not oiling the breading. Dry panko in a dry oven just dries out further. A thin coat of oil before baking is what triggers the browning and crisping you need.
- Glazing before baking. If you add the honey glaze before the chicken goes into the oven, it burns long before the crust is golden and the chicken is cooked through. Always glaze after baking.
- Not pressing the panko firmly. Panko that isn’t firmly pressed into the egg coating falls off in the oven. Press each piece firmly on all sides and don’t be gentle about it.
- Boiling the glaze. High heat makes honey crystallize and can make the glaze grainy. Keep it on medium-low and just warm it through gently until the butter melts and everything comes together.
- Leaving the chicken on the tray to rest. After the glaze goes on, rest the chicken on the wire rack — not on a plate or cutting board. The rack keeps air circulating and prevents the bottom from steaming and going soft.
Nutritional Information
Per serving (2 bone-in chicken thighs with glaze, no sides):
Serving & Presentation Tips
This chicken is naturally beautiful — the glaze does the visual work for you.
- Serve directly on the wire rack over the baking sheet for a rustic, casual look that also keeps everything crispy at the table.
- Drizzle extra hot honey right before serving — the glossy amber glaze catching the light over a golden crust is genuinely one of the most appetizing things you can put on a dinner table.
- Scatter the fresh thyme and flaky sea salt at the very last second. Both look best when freshly applied and not wilted or dissolved into the glaze.
- Serve extra hot honey in a small ramekin on the side. People will want it — guarantee it.
- Use a wooden board under the rack if you want to bring it to the table — it looks rustic, intentional, and dramatically delicious.

Frequently Asked Questions
Can I make this without a wire rack?
You can, but the bottom of the chicken will be noticeably less crispy. If you don’t have a wire rack, place the chicken on a lightly oiled foil-lined baking sheet and flip it every 15 minutes to help both sides crisp up. It won’t be quite the same as the rack method but it still tastes great.
How do I make the hot honey glaze less spicy?
Reduce the hot sauce to 1 tablespoon and cut the chili flakes to ½ teaspoon. You’ll still get that signature hot honey flavor with a much gentler heat level. For a completely mild version, leave out the hot sauce entirely and just warm honey with butter and garlic powder — it’s delicious in its own right.
Can I use this recipe with chicken wings?
Absolutely — and wings are fantastic with this method. Bread them exactly the same way and bake at 220°C (425°F) for 25–30 minutes, flipping halfway, until deeply golden and crispy. Glaze and return to the oven for 3–4 minutes as directed. They make an incredible party appetizer.
Why is my panko crust pale and not golden?
Two likely causes — either the oven wasn’t hot enough, or you didn’t oil the breading before baking. Make sure your oven is fully preheated to 220°C (425°F) and that you’ve drizzled or sprayed olive oil generously and evenly over every piece before they go in. Without the oil, panko simply can’t brown properly in a dry oven.
Can I prepare this ahead of time for a dinner party?
Yes — bread the chicken up to 24 hours ahead and refrigerate uncovered on the wire rack. The overnight rest actually improves the crust. Make the hot honey glaze ahead too and refrigerate it in a jar. On the day, bake the chicken as directed, warm the glaze gently on the stove, and glaze just before serving. It’s a great stress-free entertaining recipe.
What other honey chicken recipes should I try next?
If you love the honey-chicken combination you have to try this Honey Butter Roasted Chicken Breast — simple, juicy, and incredibly flavorful. And for a complete meal, this Honey Garlic Chicken Rice Bowl is one of our most popular weeknight dinners.
You Might Also Love
Final Thoughts
This baked crunchy hot honey chicken is the recipe that proves you don’t need a deep fryer to get serious crunch. The panko crust bakes up shatteringly crispy, the hot honey glaze caramelizes into something sticky and deeply addictive, and the whole thing comes together in 45 minutes with barely any cleanup.
Sweet. Spicy. Crispy. Juicy. It hits every note at once — and it does it from the oven.
Whether you serve it with coleslaw and fries for a casual weeknight dinner or plate it up for guests with roasted sweet potatoes, this chicken never fails to impress. Make the glaze in double and keep it in the fridge — you’ll find yourself putting it on everything.
Try it this week and let us know in the comments how spicy you went with the glaze! 🍯🔥
Baked Crunchy Hot Honey Chicken
Shatteringly crispy panko-crusted chicken thighs baked in the oven and finished with a sticky, spicy-sweet hot honey glaze. Sweet heat perfection — ready in 45 minutes.
Ingredients
For the Chicken
- 8 bone-in skin-on chicken thighs
- 1 cup all-purpose flour
- 2 large eggs, beaten
- 1½ cups panko breadcrumbs
- 1 tsp smoked paprika
- 1 tsp garlic powder
- 1 tsp onion powder
- ½ tsp cayenne pepper
- 1 tsp salt
- ½ tsp black pepper
- 2 tbsp olive oil
For the Hot Honey Glaze
- ⅓ cup honey
- 2 tbsp hot sauce (Frank’s RedHot recommended)
- 1 tbsp unsalted butter
- 1 tsp red chili flakes
- ½ tsp garlic powder
- Pinch of salt
To Finish
- Fresh thyme leaves
- Flaky sea salt
- Extra hot honey for drizzling
Instructions
-
1
Set up the breading station. Preheat oven to 220°C (425°F). Line a baking sheet with foil and place an oiled wire rack on top. Set up three dishes: seasoned flour, beaten eggs, and panko breadcrumbs.
-
2
Bread the chicken. Pat each piece dry. Dredge in seasoned flour, dip in egg, then press firmly into panko on all sides. Place on the wire rack.
-
3
Oil and bake. Drizzle or spray olive oil evenly over all pieces. Bake for 35–40 minutes, turning once at the halfway point, until deeply golden and internal temperature reaches 74°C (165°F).
-
4
Make the hot honey glaze. In the last 10 minutes of baking, combine honey, hot sauce, butter, chili flakes, garlic powder, and salt in a small saucepan over medium-low heat. Stir until smooth and glossy — about 2–3 minutes. Do not boil.
-
5
Glaze the chicken. Brush hot honey glaze generously over each piece as soon as it comes out of the oven. Return to the oven for a final 3–4 minutes until the glaze is bubbling and caramelized. Watch closely.
-
6
Rest and finish. Rest on the rack for 3–4 minutes. Scatter fresh thyme and flaky sea salt over the top. Drizzle with any remaining glaze.
-
7
Serve immediately. Serve straight from the rack while the crust is at its crispiest. Offer extra hot honey on the side.
Don’t skip oiling the panko before baking — this single step is the difference between a pale, dry crust and a deeply golden, shatteringly crispy one.
Make a double batch of the hot honey glaze and keep it in a jar in the fridge for up to 2 weeks. It’s incredible on pizza, roasted vegetables, and even eggs.
For the crispiest possible result, bread the chicken the night before and refrigerate uncovered on the rack. The overnight rest dries out the breading slightly and gives you an even crunchier crust when baked.